Triaxial testing

Some potters in China still seem to mix glazes the old-school way- one cup of this, two cups of that. And this technique seems to work pretty well for complex traditional materials. Personally, I am also terrified of mixing up a great glaze but not remembering the exact composition or, even worse, not knowing how to adjust it if it doesn’t come out right. So I rely on a lot of line blend and triaxial glaze testing.
Line blends are a useful tool for comparing two different recipes. Commonly, the two recipes are different glazes. For instance, you can blend two different celadon glazes in different proportions to create a new celadon recipe. Line blends are also commonly used for testing additions of coloring oxides, for instance the effect of incrementally adding iron oxide to a clear glaze.
The range of the line blend is arbitrary- you can start each variable from 0% and go up to 100% or you could choose any range in-between.
For example, when adding red iron oxide to a reduction-fired clear glaze like Leach 4321, a line blend from 0% to 10% in 1% increments is sufficient to see the gradual transition from clear to blue celadon (1%), light green celadon (2%), dark green celadon (3-4%), brown, and tenmoku (7-10%).
To illustrate a line blend, here is a sample using two RGB colors blending by opacity. If you already know the result of the outlying 100% blends, you could remove them from the test. However, each firing is different and I usually leave in the 100% blends regardless.

Line blend of red and blue RGB colors by opacity
You could mix each test in a line blend individually, but a much less time-consuming method is to only make the left and right-most 100% solutions. Using a syringe, you can easily create each mixed blend.
Ian Currie popularized volumetric blending. (See his article here.) First, mix the same weight of each glaze you will be blending. Second, add some water to the glazes and sieve thoroughly. Third, add water to each glaze so that their volumes are equal. Now the two glazes are ready for blending.
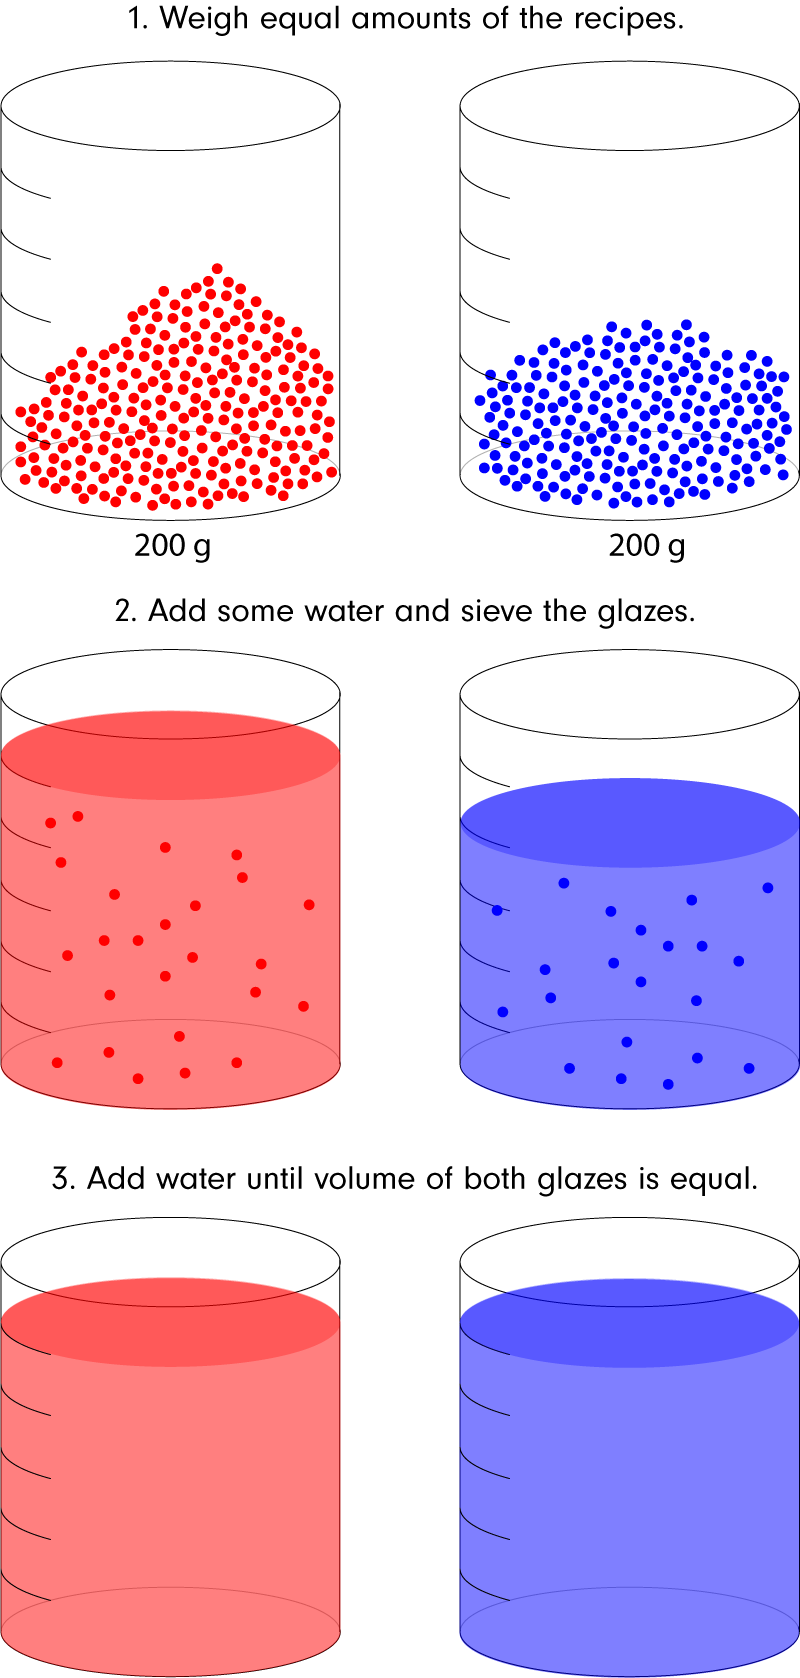
Preparing glazes for volumetric blending
Below is an illustration of the blends in a 20ml syringe. For my test tiles, 20ml is the minimum volume I need in order to completely cover a test tile (including a second dip). See here for more information on how I make test tiles.

Using a syringe to perform volumetric blending
As you can see, for 10% increments using a 20ml syringe we need at least 20+18+16+14+12+10+8+6+4+2 = 110ml of each 100% recipe. Preparing 100 grams of glaze material for each glaze should be sufficient.
Each time before you take glaze into the syringe, be sure to re-mix the glaze and confirm it has not settled.
Although I use 20ml test batches, it’s easier to use a 30ml syringe so there is extra room for drawing in air, making it easier to mix the glazes.

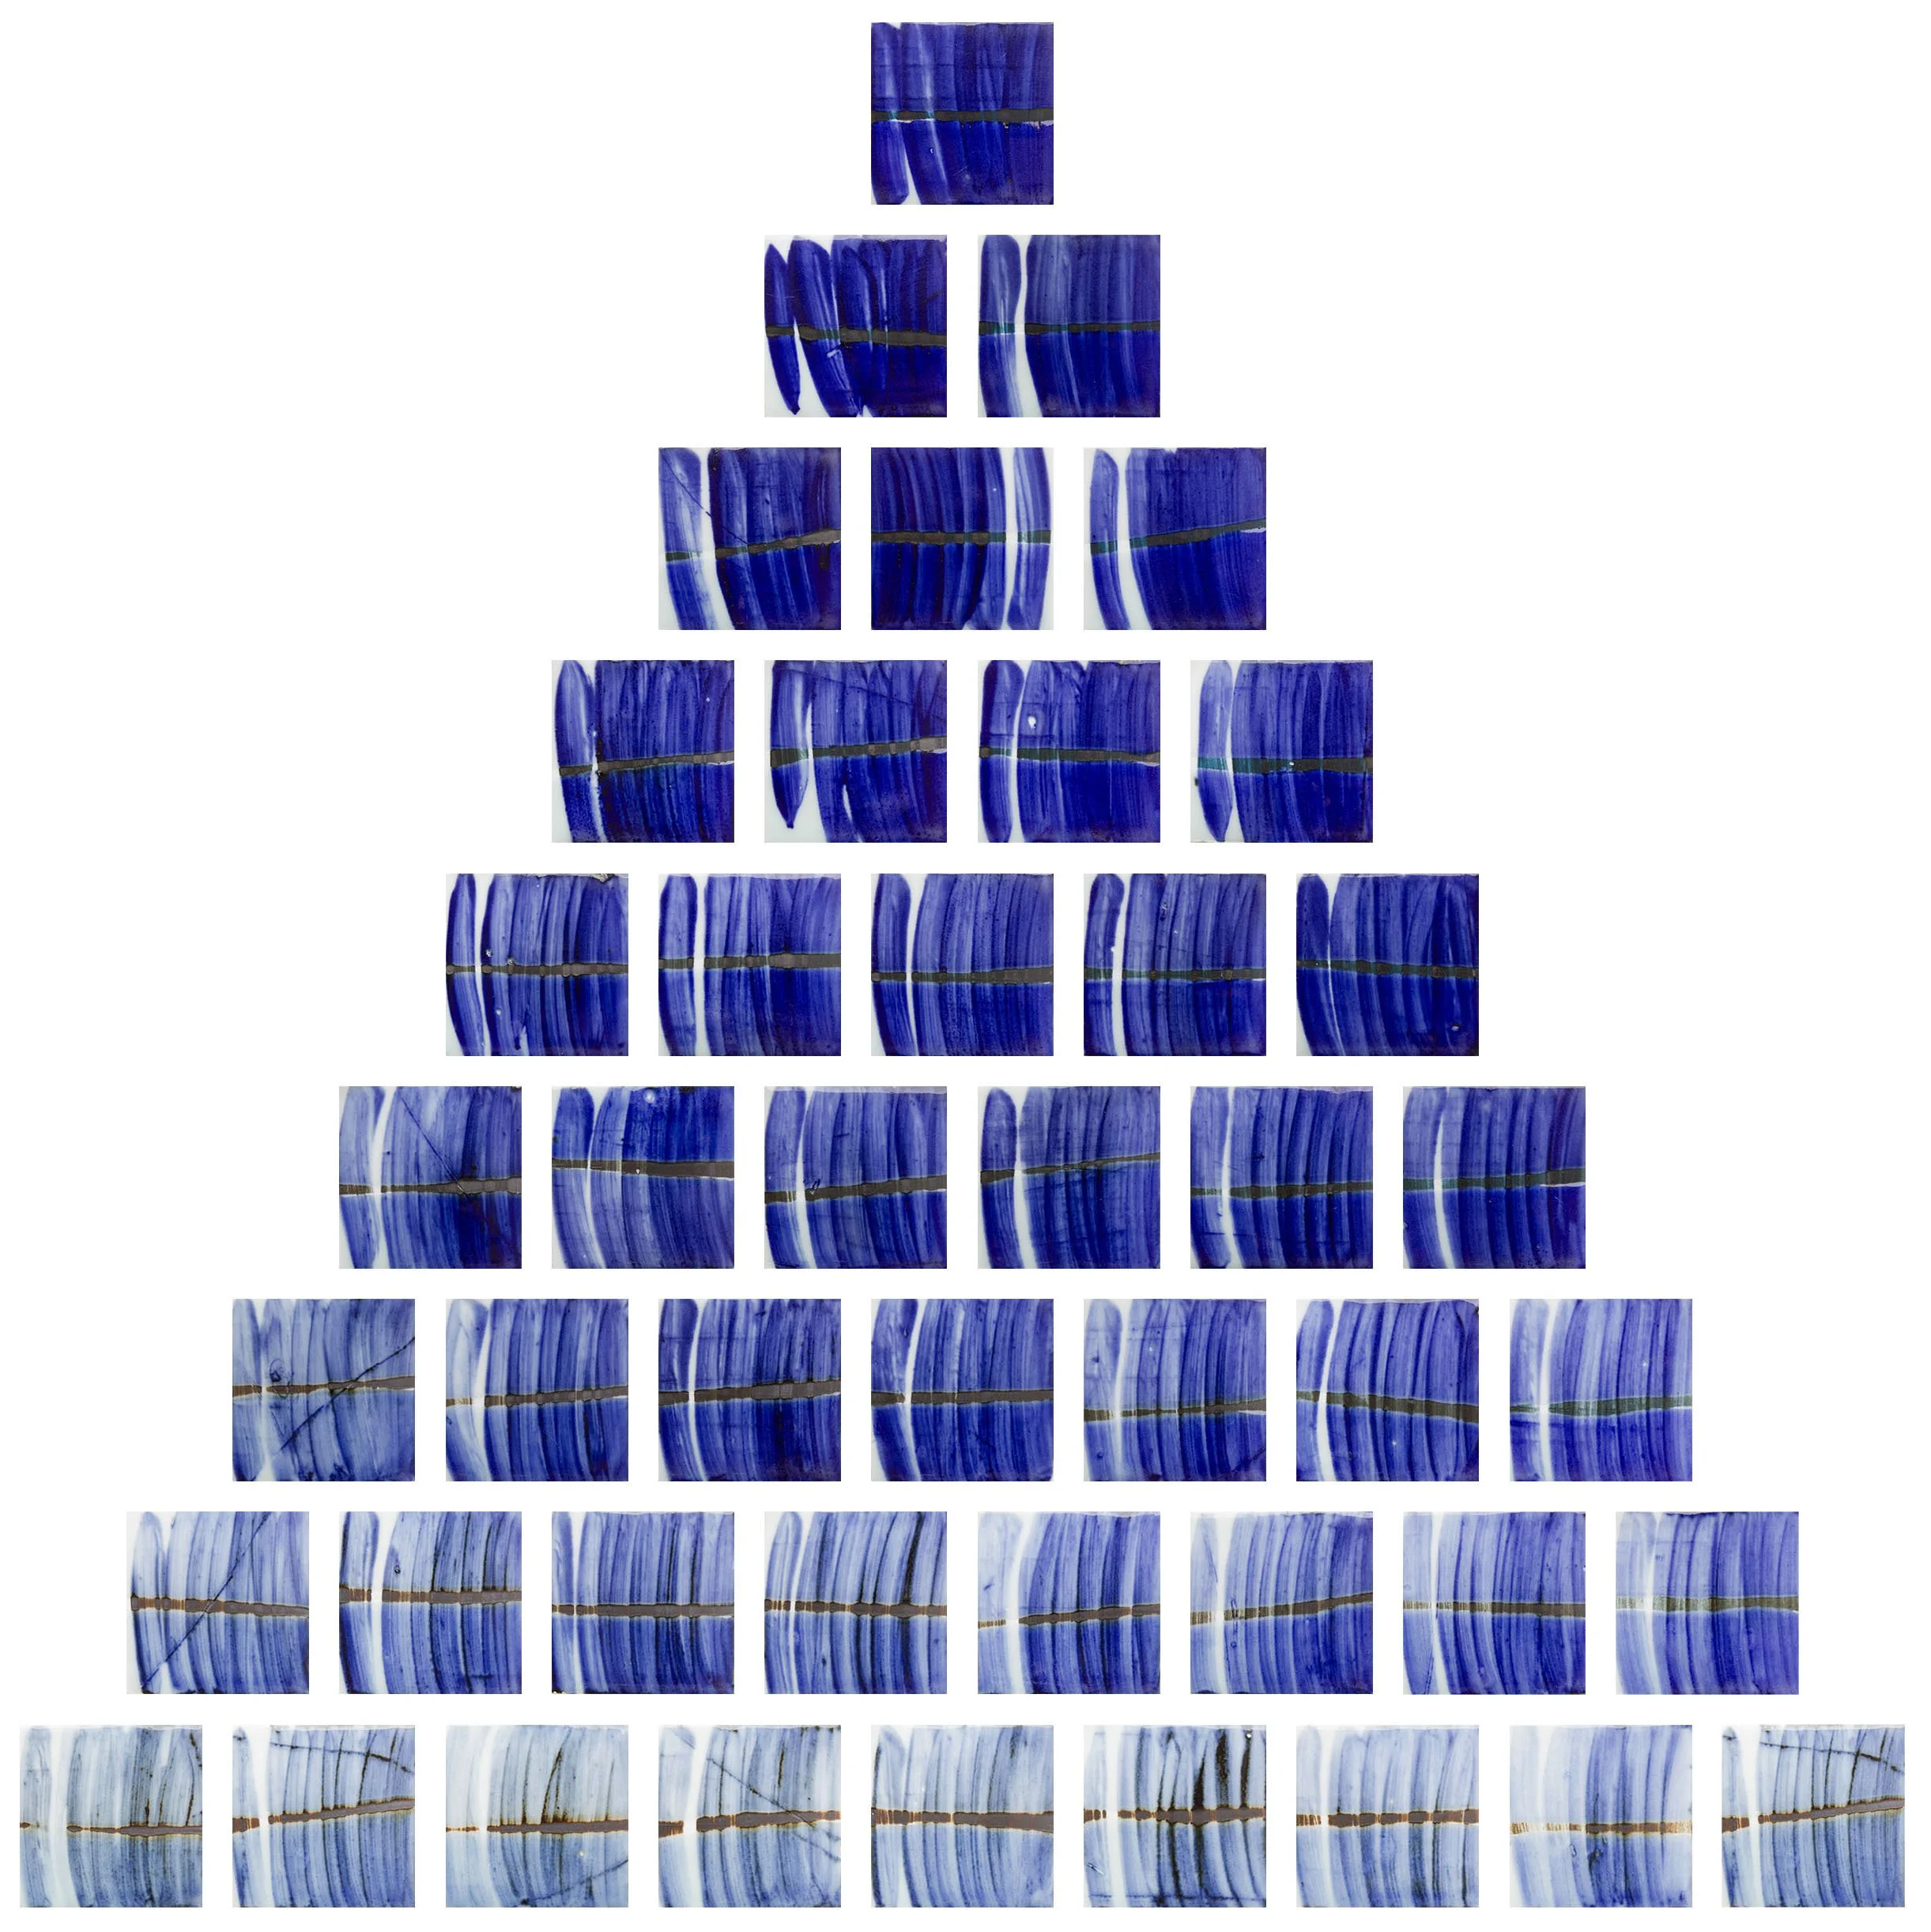
Volumetric line blending of 20ml glaze in a 30ml syringe

A triaxial volumetric line blend. Test tiles and glazes are arranged in order.

On the back of each test tile is written the full glaze information.

Test tiles resulting from a volumetric line blend. Increasing amounts of red iron oxide added to a clear glaze.

Fired result of the same test tiles. Reduction Orton cone 10.
Here is a line blend of Dolomite added in 2% increments to a Chinese porcelain stone. Normally, I would test from 4-14% Dolomite, as I know from experience that this is the most useful range. Below are the tests from 4-12% Dolomite in which the porcelain stone turns from a satin-matte to light celadon glaze.

Mixtures of porcelain stone and 4-12% Dolomite
However, it’s often good to test beyond the limits. We might expect that even more Dolomite added to this glaze stone will result in a runnier, more transparent celadon/clear glaze. But ceramics is much more complicated than simply mixing two colors together.
Here is the same test carried further, from 16% to 20% Dolomite. We’ve gone from a creamy satin-matte to celadon and now to Dolomite matte with crystals.
This test also shows the importance of making small increments when doing line blends.

Mixtures of porcelain stone and 16-20% Dolomite
Triaxial Blends
Ceramics recipes are a complex interaction of multiple variables. Triaxial blends involve three variables, making them more useful for exploring ceramic glazes and bodies.
Below is a four-row opacity triaxial blend of three colors (red, green, and blue) in RGB with a range of 0%-100% for each color. The outer edges of the blend are simply line blends of two colors, while the middle area of the blend contains mixes of all three variables.

Four-row triaxial blending RGB colors by opacity
The size, variables, and ranges of a triaxial are completely up to you. A four-row triaxial with ranges starting at 0% is of limited use in testing mixes of all three variables. You could adjust the four-row triaxial for ranges of 20%-80% so that each test includes at least some percentage of each variable. Or, you could move up to a five-row triaxial for even more results.
Below is a five-row opacity triaxial blend of three colors (red, green, and blue) in RGB with a range of 20%-100% for each color. Because the range starts at 20%, each test includes all three variables. If you instead wanted the outer blends to represent line blends, the ranges would start at 0%.

Five-row opacity triaxial RGB blend, 100-20%
Moving up to six and eleven-row triaxials you will notice that the number of tests we are creating is growing very quickly. Because the range is from 0%-100%, the outer edges of the triaxial represent simple two-variable line blends.

Six and eleven-row triaxial RGB opacity blend, 100-0%
Based on these simple RGB color-blend triaxials, it might seem as if larger numbers of rows are unnecessary since we can easily infer the range of colors from a smaller four or five-row triaxial. However, as mentioned before, ceramics recipes are a complicated mix of ingredients and sometimes results do not transition gradually from one test to the next. Using too small of a triaxial with too large of an increment might miss important changes in glazes. For instance, if Whiting were one of our variables in an eleven-row triaxial, the difference between each Whiting increment would be drastic.
Triaxial Size
The number of tests required for a given triaxial size can be determined by the triangular number sequence. For a triaxial with only one row we of course need only one test. But the number goes up very quickly as we add rows: 2 rows has 3 tests, 5 rows has 15 tests, 11 rows has 66 tests, and so on.
If we want to create a triaxial where each variable is in the range of 0%-100% and tests are in 10% increments, we will need an 11-row triaxial with 66 tests. Unfortunately, it takes a lot of time to create so many test tiles! It would be nice if we could create meaningful tests while at the same time reducing the size of the triaxial.
Reducing Triaxial Size
Often we already have idea of the ranges we want for each variable in a triaxial.
For example, say we’d like to find a nice Chinese blue & white qinghua underglaze. Nigel Wood’s Chinese Glazes shows that qinghua is not simply cobalt blue but rather a complicated mix of oxides. We decide upon three basic variables for our triaxial: cobalt (top), iron (left), and manganese (right). In order to do a comprehensive test, we decide to use steps of 10% for each variable. Usually we would need a full 11-row triaxial for this type of test, necessitating 66 tests. However, we decide that the left side (a line blend of cobalt and manganese) and the bottom side (a line blend of iron and manganese) are not interesting to us, so we can leave those out. Now we are left with only 45 tests, in other words a 9-row triaxial.

Triaxial with eliminated tests. The sides are simply line blends. For this test we leave out the left and bottom sides.
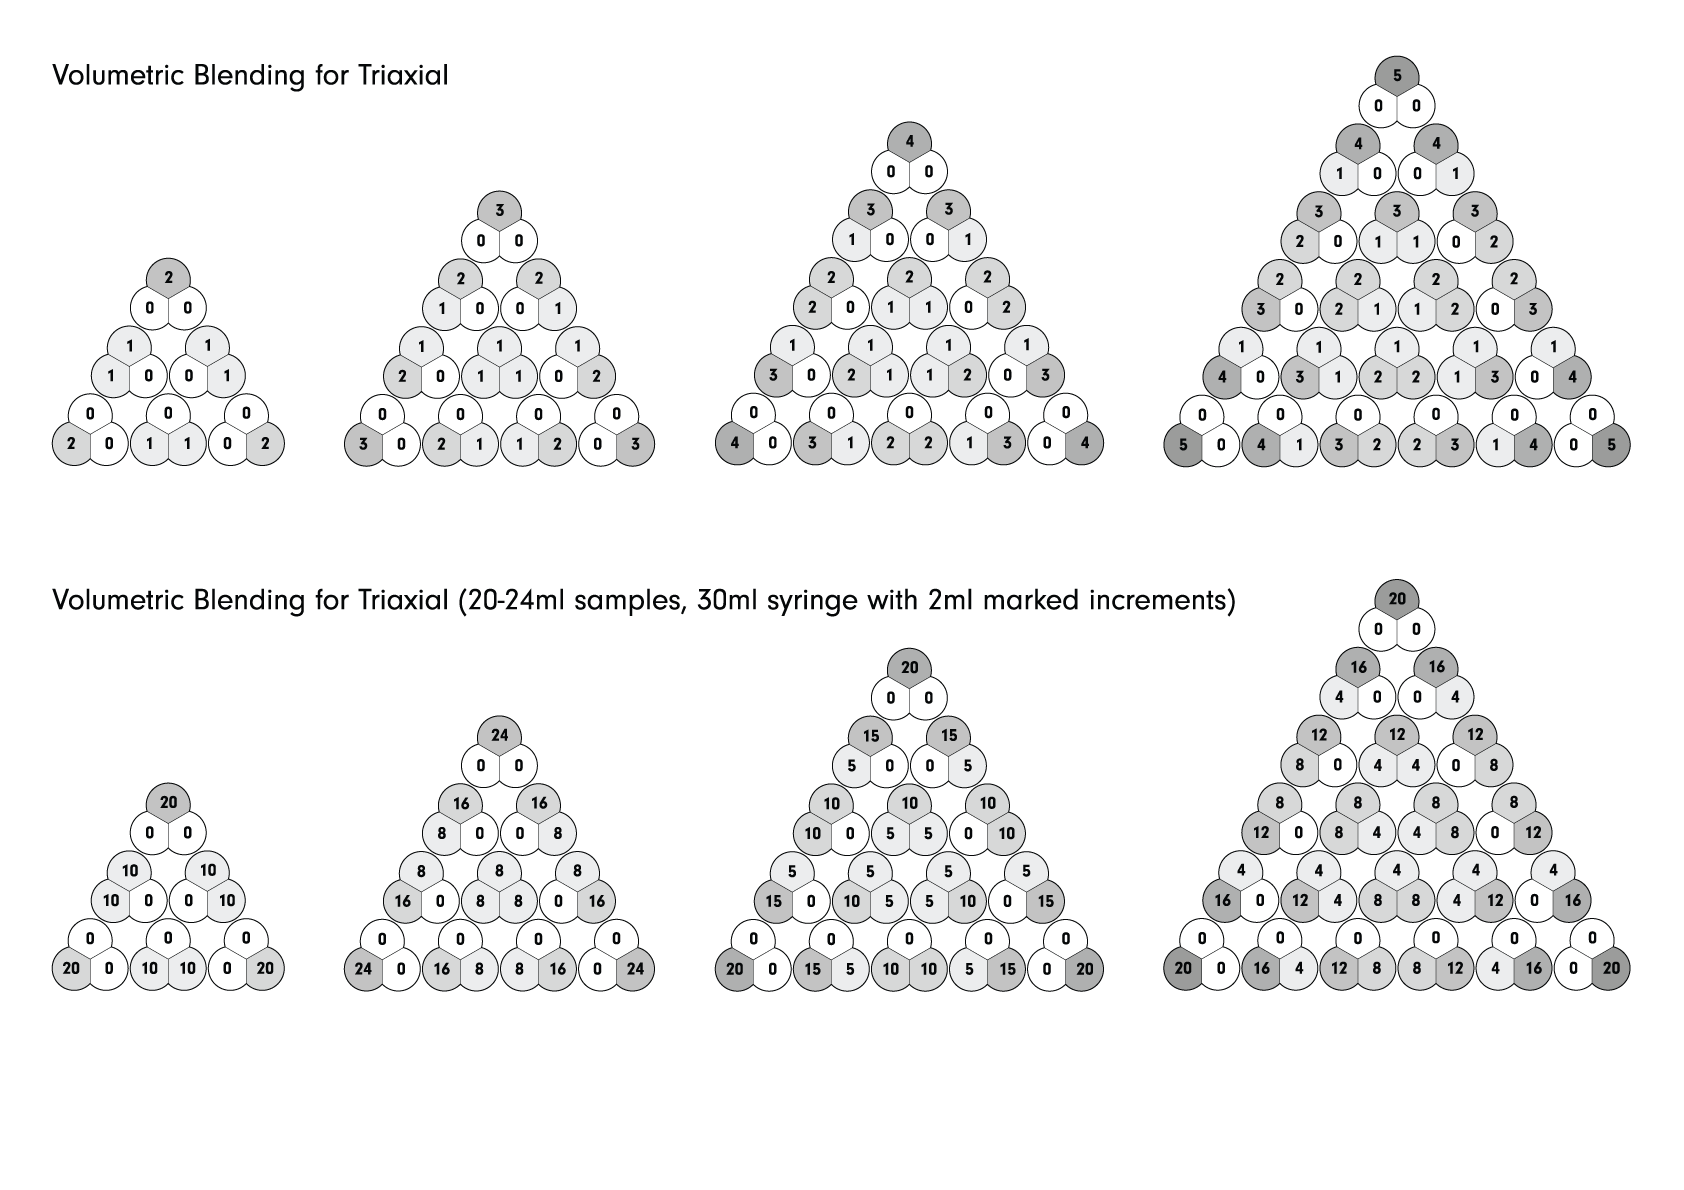
Volumetric Blending for Triaxials
In our blue & white (qinghua) underglaze triaxial we still have 45 tests to make. But instead of mixing each test individually, we can use Ian Currie’s volumetric blending to create intermediate tests.
Starting at the top of the triaxial pyramid, remove each adjacent glaze. Now we are left with only 15 glazes to mix. To produce the intermediate glazes, simply mix the two glazes in a 1-to-1 relationship by volume.
Note that the more times you need to mix a glaze, the more total glaze material you will require. For the type of triaxial below I usually mix 200 gram batches in order to ensure that I have enough glaze. My test tiles only require 20ml of glaze each.

Volumetric blending of triaxial, 50% mixes
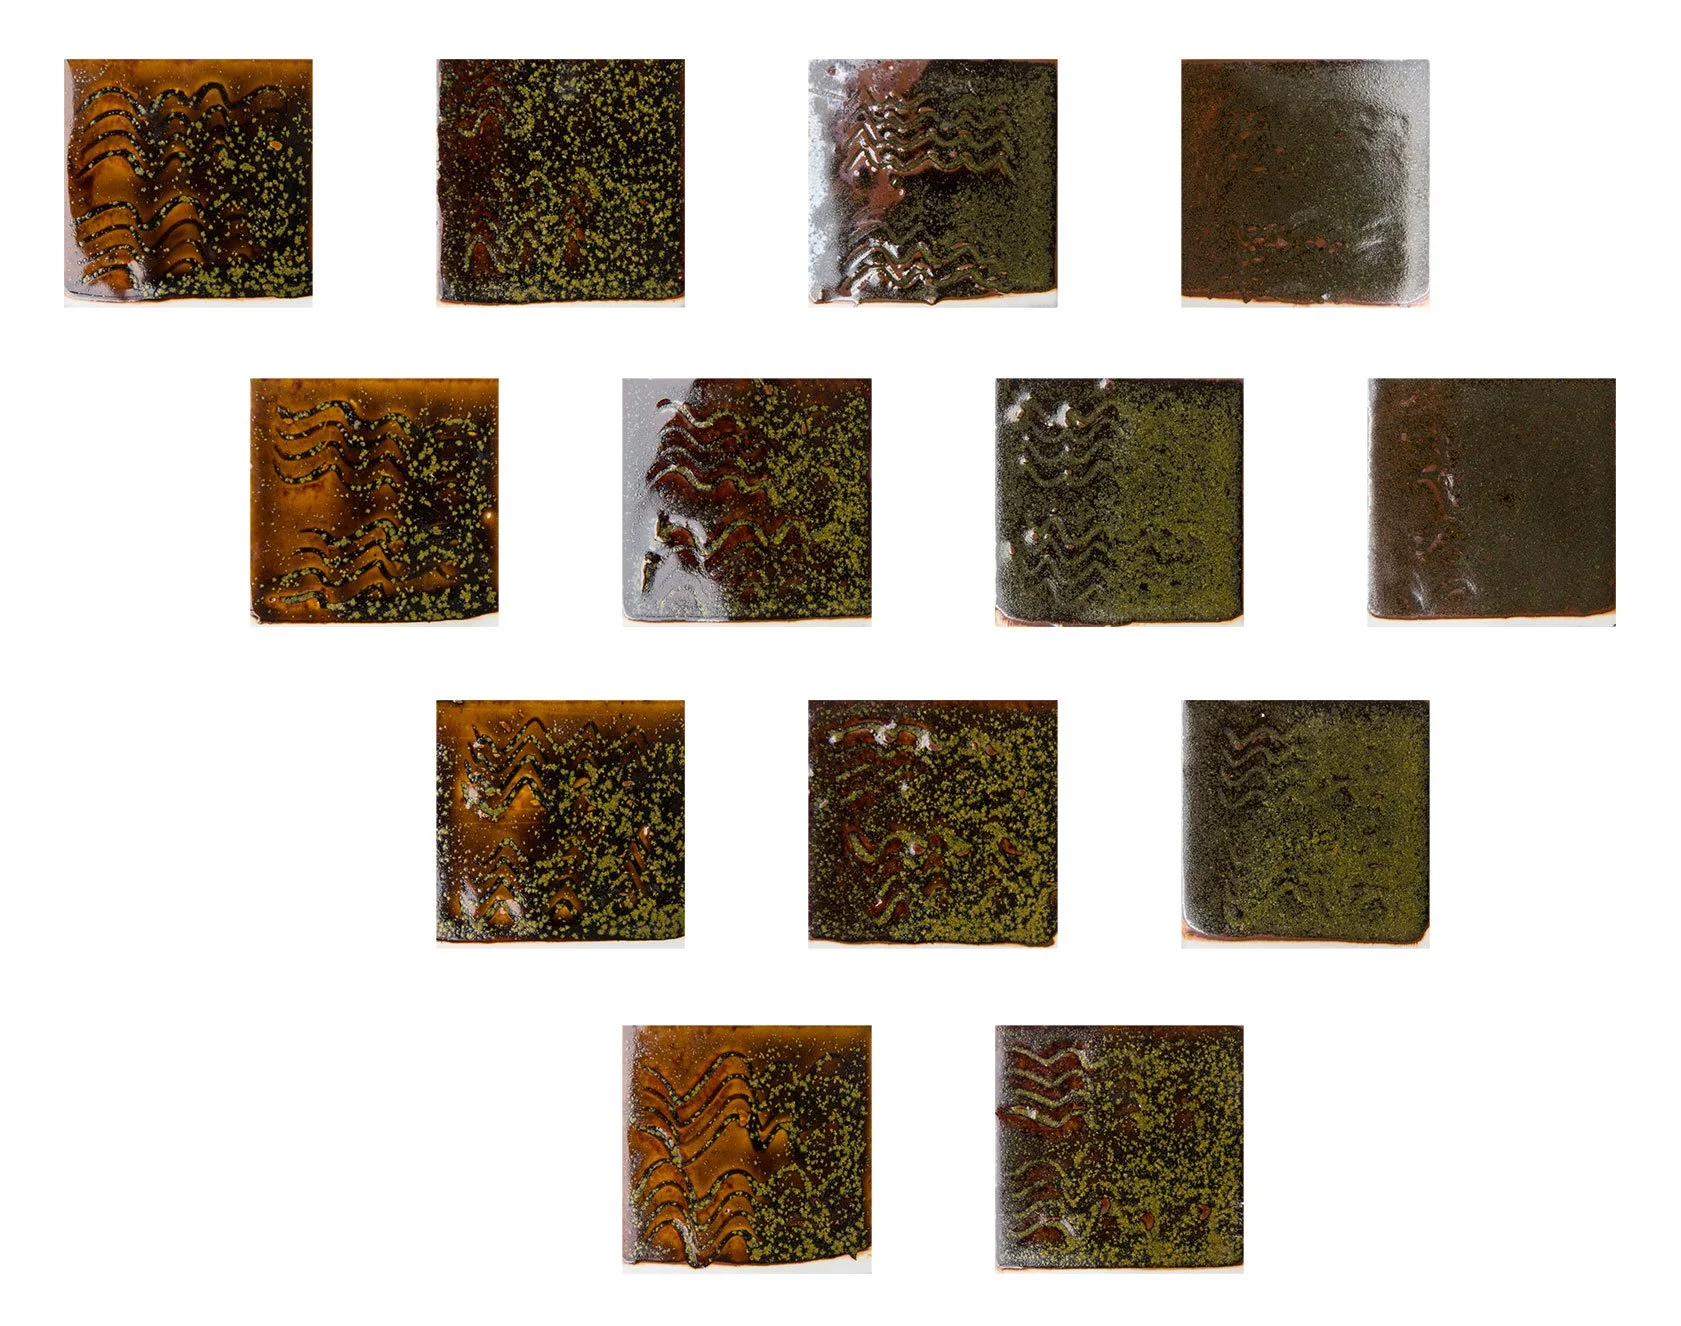
We can further reduce the number of glazes to prepare, with the trade-off of more numerous and more complicated volumetric blends. In the example below, we are only left with 6 glazes to make.

Further volumetric blending of triaxial
The actual fired result of this triaxial is much less balanced than the computer-generated RGB diagrams. It’s apparent that cobalt oxide is a much stronger colorant than both iron oxide and manganese. It seems the most interesting results are in the bottom two rows of the triaxial. It might be interesting to “zoom in” on the bottom portion of the triaxial to refine the color even further.
In designing the tests, we also take into consideration that the glaze that covers an underglaze will affect the resulting color. So for each test tile, the top half is covered with a basic transparent glaze (Limestone), while the bottom half is covered in a traditional chinese glaze (灰釉). The narrow unglazed band in the middle gives us further information.
Fired result of cobalt, manganese, iron triaxial.
The changes in coloring oxide triaxials are usually straightforward- colors gradually shift. Results are not so certain, though, when performing triaxial tests on other glaze components such as glass formers, melters, stabilizers and opacifiers. Sometimes huge changes in a glaze can occur within only one or two-percent changes of the recipe. So ideally, for each glaze test we would create a 51-row (range of 0%-100% in 2% increments) or 101-row (range of 0%-100% in 1% increments) triaxial. But a 51-row triaxial needs 1,326 tests, while a 101-row triaxial needs 5,151 tests!
So in designing triaxials with small percentage increments it is often necessary to eliminate vast swaths of the triaxial.
For example, in the partial triaxial below I am searching for a nice teadust glaze. The triaxial is based on 2% increments of Chinese glaze stone, whiting, and silica. From experience and prior testing, I have already determined fixed percentages for ingredients not included in the test (red iron oxide and talc), and I have set fixed ranges for the three variables. For instance, from past tests I know that I do not want too much or too little whiting- a range of 10%-16% is enough. In this manner I have pared down a 1,326 test triaxial to only 13 tests.
As you can see in the results below, there is indeed a great range of glazes even within 2% increments. If I had created a smaller triaxial with larger 10% increments I might have entirely missed the teadust crystal effect.

All possibilities for a triaxial with 2% increments. Shaded area represents actual test.
Traditional teadust glaze. Partial Triaxial, 2% Increments
Further reducing size
By plotting out all of the tests (or even just the extremities) in the large triaxial above on a Silica/Alumina chart, we can further reduce the number of glaze tests. From experience, it’s obvious that a cone 10 glaze with 60% Whiting and no Feldspar or Silica won’t work out very well. But by looking at the chart, we can see entire areas of the test triaxial that are “out of bounds” for a good glaze and thus probably don’t need to be included.
Having said that, there are some interesting glazes (like Shinos) out of the ranges of commonly accepted glaze limits. And in my example above, the tests that look most to me like teadust are quite high in silica and fall just inside the blue “underfired” zone.
For more information, see R.T. Stull’s original article in Transactions of the American Ceramic Society, Volume 14, pages 62-70.

Large 2% triaxial plotted on SiO2/Al2O3 chart with Stull overlay
Conclusion
Tests build upon each other. Coarse triaxials can be later refined, and specific glazes targeted within smaller ranges. The more experience you have, the more you know where to look. If you’re just starting out, I recommend a large, 11-row triaxial of Potash Felsdpar, Silica, and Whiting which will reveal a range of glaze types, from celadons to mattes. Once you have a good feldspar/silica/whiting glaze you could try adding coloring oxides, stabilizers like ball clay or kaolin, opacifiers, etc.
Triaxial Worksheets Download (PDF)

Old Triaxial Worksheet
Old Triaxial Blending Chart